Complete documentation
Run the whole workflow.
Everything below follows the bot in the order you will use it: configuration, scheduling, review, editing, deletion, and recovery.
Getting Started
Once Scheduler is in your server, you need to complete two setup steps before you can use any of the announcement commands. One configures the bot for your server, and the other configures your personal preferences. Neither takes long, but both are required.
Server Settings
Command: /settings server
This command sets up the announcer profile for your server. Every announcement sent by Scheduler will appear under this profile rather than under the bot's own name and avatar, so you can make it look however you want.
Running the command opens a form with three fields.

Announcer Name - The name the bot will use when posting announcements. This can be anything up to 80 characters, such as the name of your server or a role like "Moderator Team."
Announcer Profile Picture - The profile picture the bot will use when posting announcements. Upload a single image file here.
Error Channel - The channel where Scheduler will send notifications if something goes wrong while trying to post a scheduled announcement. This should be a channel that your moderation team or bot managers can see. It supports text channels, announcement channels, and all thread types. You do not need to check this channel constantly; the bot will only post there when there is a problem that needs your attention.
Once submitted, your settings are saved to the server. You can run /settings server again at any time to update the announcer name, profile picture, or error channel.
User Settings
Command: /settings user
This command sets your personal timezone. Scheduler uses your timezone whenever you schedule an announcement so that the time you enter is the time you actually mean. Without a timezone configured, you cannot create or edit announcements.
The command has one required option: timezone. As you type, an autocomplete list will appear with matching timezone options. The list only shows up to 25 results at a time, so your timezone will likely not appear just by scrolling through it. Type the name of your timezone (such as "New York" or "London") or your UTC offset (such as "UTC -5") to narrow the results down until you find the right one.

Once saved, your timezone applies to all announcements you schedule or edit going forward. If you ever move or want to change it, just run /settings user again.
The Visible Option
Every announcement command (schedule, view, edit, and delete) includes an optional field called visible. This controls whether the bot's response is visible only to you or to everyone in the channel.
By default, when you do not set the visible option, all responses are ephemeral. That means only you can see them, and no one else in the channel will know you ran the command. This is the recommended default for most situations since it keeps your server tidy while you are working on an announcement.
If you set visible to Yes, the bot's response will be posted publicly in the channel for everyone to see.
This option exists on every announcement command and will not be mentioned again for each individual command below.
The Announcement Autocomplete
The /announcement view, /announcement edit, and /announcement delete commands all use an autocomplete search field to find announcements for the required announcement field. As you type, the bot will show matching results by name or ID. The list displays a maximum of 25 results at a time, so if you have more than 25 announcements you will need to type more of the name to narrow it down. All three commands search across both active and archived announcements.
This functionality exists on every announcement command and will not be mentioned again for each individual command below.
Scheduling an Announcement
Command: /announcement schedule
This is the main command for creating a new announcement. It takes one required option: name. Give the announcement a unique name that will help you identify it later, up to 50 characters.
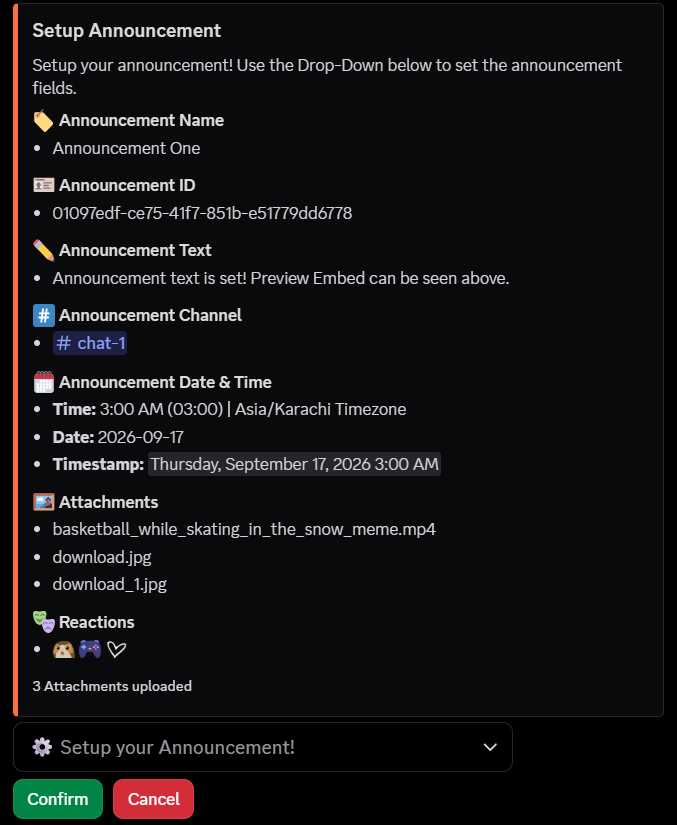
After running the command, Scheduler will send a setup form showing all the fields for your announcement. At first, most fields will show as "Not Set" because you have not filled them in yet.

The form shows:
- Announcement Name - The name you entered when running the command.
- Announcement ID - A unique identifier generated automatically. You may need this if the announcement encounters an error later.
- Announcement Text - Not Set until you use the Set Text option.
- Announcement Channel - Not Set until you use the Set Channel option.
- Announcement Date and Time - Not Set until you use the Set Date and Time option.
- Attachments - Shows "None" until you upload files.
- Reactions - Does not appear until you add reactions for the first time.
Below the form is a dropdown menu and two buttons: Confirm and Cancel.
The Setup Menu
The dropdown menu is how you fill in each part of your announcement. Click it to see all six options.

You can use the options in any order and as many times as you like before confirming. Each one opens a separate form or menu. Changes appear in the setup form as you go.
Set Text
Select Set Text from the dropdown to open the text input.

Type the message you want the announcement to contain. The text can be up to 4,000 characters. Standard Discord formatting works here, including bold, italics, mentions, and links. When you submit, a preview embed will appear above your setup form so you can see roughly how the text will look.

You can go back and change the text as many times as you want before confirming. The preview will update each time.
One tip worth following: write your announcement text in a private channel first, then right-click your message and use the Copy Text option before pasting it into the modal. Discord's Copy Text button copies the full underlying formatting, including the correct IDs for custom emojis, channel mentions, and role mentions. If you type a custom emoji name directly into the modal (for example :CustomEmoji:) the bot will not be able to resolve it because it only sees the raw text, not the emoji itself. Copying from a Discord message ensures everything renders correctly in the final announcement.
Add Media
Select Add Media from the dropdown to open the media upload form.

You can attach up to 10 files total across all uploads for a single announcement. The form shows how many slots remain based on what you have already uploaded. There is also a Spoiler Content checkbox. If you check it, all files uploaded in that batch will be sent as spoilers when the announcement is posted.
Once uploaded, you can see the attachment names and the count towards the bottom of the setup embed.

Upload size limits
The maximum file size per upload depends on your server's boost level.
| Boost Tier | Upload Limit |
|---|---|
| Tier 0 and Tier 1 | 10 MB |
| Tier 2 | 50 MB |
| Tier 3 | 100 MB |
If any file you try to upload exceeds the current limit, the bot will reject the upload immediately and let you know. Nothing will be saved from that batch.
If you have Discord Nitro, the upload form may display "Upload files up to 500 MB," but your server's boost tier limit still applies regardless. If you upload a file that exceeds the server's limit, the bot will show you an error after the upload and will not save the file.
Keep in mind that if your server loses a boost tier after you have already attached files, the bot may not be able to send those files when the scheduled time arrives. In that case it will report the failure in your error channel with instructions on how to fix it.
Remove Media
Select Remove Media from the dropdown to open the removal form.


A list of all currently attached files will appear. Select whichever ones you want to remove and submit. The setup form will update to reflect the new attachment count.
If there are no files attached yet, this option will show an error letting you know there is nothing to remove.
Set Channel
Select Set Channel from the dropdown. A channel select menu will appear.

Choose the channel where you want the announcement to be posted. Scheduler supports text channels, announcement channels, and all thread types. After you select a channel, the bot checks that it has the necessary permissions in that channel (specifically the ability to manage webhooks and view the channel). If it does not, it will let you know so you can fix the permissions before confirming.
Set Date and Time
Select Set Date and Time from the dropdown to open the date and time form.

The form has three parts, all in one place.
Date - Type the date in YYYY-MM-DD format. For example, 2026-12-25 for December 25, 2026. Single-digit months and days are also accepted, so 2026-1-5 works just as well as 2026-01-05.
Hour - A dropdown with all 24 hours displayed in both 12-hour and 24-hour formats so you can pick whichever you read more naturally.
Minute - A dropdown with minute options in 5-minute increments: 00, 05, 10, 15, and so on up to 55.
All times use the timezone you configured with /settings user. After submitting, the setup form will show the date, time, and a Discord timestamp so you can confirm it is exactly when you intended.
If you enter a date or time that is already in the past, the announcement will not be rejected. It will simply post on the very next task cycle, which runs every 15 seconds. This is also useful if you need to requeue an announcement quickly.
Set Reactions
Select Set Reactions from the dropdown to open the reaction picker.


The picker shows one or more select menus populated with your server's custom emojis. Only custom server emojis are supported here; standard Unicode emojis cannot be used as automatic reactions. If your server has more than 25 custom emojis, they will be split across multiple menus.
You can select up to 10 emojis in total across all the menus. After making your selection, click Set Reactions to confirm or Cancel to discard the selection without saving.
Once reactions are saved, the setup form will show a Reactions field displaying your chosen emojis. You can open the reaction picker again at any time to change your selection.
Confirming and Cancelling
When you are happy with your announcement, click Confirm. Three fields are required before the bot will accept it: the announcement text, the channel, and the date and time. Attachments and reactions are optional. If any required field is still showing "Not Set," the confirmation will be rejected and the bot will prompt you to finish the setup.
Once confirmed, your announcement is saved and will be posted automatically at the scheduled time.
If you want to discard the announcement entirely, click Cancel. This removes the setup form and nothing will be saved or scheduled.
Viewing an Announcement
Command: /announcement view
Use this command to look up the details of any scheduled announcement.
Selecting an announcement displays a details embed with everything stored for it.

The embed shows the announcement name, its ID, when it is scheduled to be sent, who scheduled it, the target channel, any attached file names, and if the announcement was edited after being created, who edited it last.
There is also a Preview button. Clicking it will show you the announcement text and any attached files. The preview is always ephemeral, visible only to you, regardless of the visible setting you used for the command.

Editing an Announcement
Command: /announcement edit
Use this command to change any part of an existing announcement.
Selecting an announcement opens the familiar setup form, this time pre-filled with everything already configured for it. If the announcement has text, a preview embed will appear above the form. All six dropdown options are available exactly as they are during scheduling.
Make whatever changes you need and click Confirm when done. The announcement is updated immediately. If you are editing an archived announcement (one that previously failed to send and got archived), confirming it re-queues it to be sent. If the scheduled time is still in the future it will wait until then. If the time has already passed it will post on the very next cycle, within 15 seconds.
Clicking Cancel discards your edits and leaves the announcement unchanged.
Deleting an Announcement
Command: /announcement delete
Use this command to permanently delete an announcement.
After selecting an announcement, a confirmation embed appears showing all of its details. There is also a Preview button so you can double-check the content before committing.

You have 120 seconds to click Confirm or Cancel. Confirming deletes the announcement from the queue and removes all attached files permanently. This cannot be undone. If you do not respond within 120 seconds, the request times out and nothing is deleted.
There is also a Preview button. Clicking it will show you the announcement text and any attached files. The preview is always ephemeral, visible only to you, regardless of the visible setting you used for the command.
Errors and the Error Channel
The error channel you configured in /settings server is where Scheduler sends notifications when something goes wrong while trying to post a scheduled announcement. You do not need to do anything with it under normal circumstances. It is only used when the bot runs into a problem.
Retry Behavior
When an announcement fails to post, the bot does not give up immediately. It will retry up to 3 times, with each retry happening on the next 15-second task cycle. If the announcement succeeds on any retry, it posts normally and nothing is sent to the error channel.
If the announcement still fails after 3 retries, it is archived. The bot sends a message to your error channel explaining what happened and providing the announcement ID and a link to the /announcement edit command.

Archived Announcements
When an announcement is archived after repeated failures, it is no longer in the active queue, but it is not deleted. You can still find it via /announcement view or /announcement edit using its name or ID.
To requeue an archived announcement, use /announcement edit, make whatever changes are needed to address the problem (such as swapping out a broken file or updating the channel), and click Confirm. This puts the announcement back into the active queue. If the scheduled time is in the past, it will post on the very next cycle.

File Size Errors
If the bot cannot send an announcement because one or more attached files exceed the server's upload limit (for example if your server lost a boost tier after the files were uploaded), the announcement is archived immediately without any retries. The error message in your error channel will explain which announcement was affected and will give you instructions to edit it, remove or replace the oversized files, and confirm to requeue it.
What a Sent Announcement Looks Like
Once the scheduled time arrives, Scheduler posts the announcement in the channel you selected. It appears under the announcer profile you set up with /settings server, using the name and profile picture you configured. Any attached files and auto-reactions will also be applied.
